Recently, I received an email from a customer inquiring about “step through” frames. Often the need arises from a physical disability, a lack of flexibility or the need to achieve that certain comfort and confidence level that only a step through provides. As we exchanged emails, I learned a lot about bike design, thanks to this customer’s curiosity and engineering nous. I thought it would be helpful to share this wealth of information.
The Problem:
A small rider (4’11” – 5′ tall with a 25″ inseam) wants a bike with a step through height no higher than 16.5″. Since she’s returning to cycling after a 30 year hiatus, she has to re-learn the sport. The goal is to participate in a 50k race at least once a year. But for now, she needs a bike on which she can reintroduce herself to riding.
Unraveling The Problem:
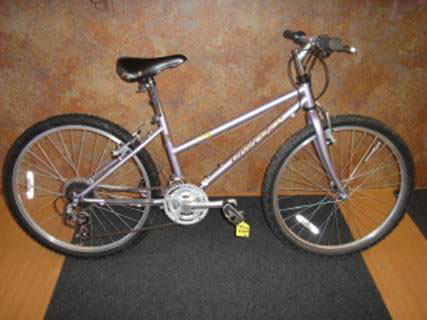
We could build a custom bicycle for this customer, but as she investigated her options, it seemed to her to make more sense in the short term to try to find a beater bike she could use as an intermediate step to a bespoke solution. The beauty of taking this path is that it allowed her to determine what the geometry of her ultimate bike would look like. What better place to start than the local pawn shop?! I’m sure this little Gary Fisher bike thought it had died and gone to heaven when it was rescued from a life of curb jumping.
One of the first issues to deal with was the seat tube length and the crank arm length. She reasoned that given her 25″ inseam, a custom bicycle with a 43 cm seat tube didn’t leave much left over for the seat height and the reach to the pedals. Worst case, if she couldn’t lower the saddle enough, her hips would rock as she pedaled — not only uncomfortable, but inefficient as well. At this size, there is clearly a relationship going on between choosing the right seat tube length and the right crank arm length.
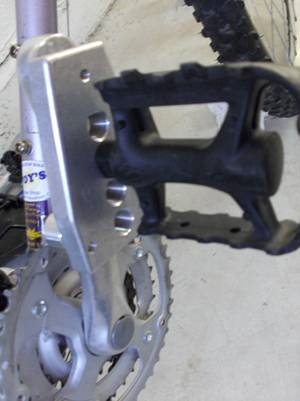
The Fisher came with 162.5 mm cranks, but they felt too long when it came to getting re-acquainted with balancing and starting up the bike. After all, skills need to be refreshed after 30 years! The solution was crank shorteners. These aren’t hard to find and are often used on tandems to accommodate a child’s shorter legs.
By trying different crank arm lengths, she was able to find the one that let her gradually acclimate to the feel of starting up on the bike. As she became more comfortable with this, she was able to lengthen the crank arm. Because of some physical limitations she has, the final crank arm length may end up being more a function of what works best for her rather than what the rules say about crank arm length.
For that matter, the rules seem to be perpetually in flux, depending on whose study you’re reading at the time. One study has indicated that the optimal crank length is 20% of leg length and that most adults are fine with the ubiquitous 170 mm crank. In response to the concern that what applies to “average” adults may not apply to those with smaller legs, the same study done with 8 – 11 year old boys also supported the use of the 170 mm length.
A July, 1982 Bicycling article by a former research engineer at Schwinn Bicycle Company matched up leg length and riding style to determine optimal crank arm length through use of a nomograph. The author focused on “pedal feel”, which depends on crank length and crank rpm. Much like wheel size, crank arm length is not hallowed on its own, but part of an integrated system.
Dig deeper into the research and you’ll learn about pedal speed (the velocity of the pedal and your foot) and pedaling rate (the revolutions made in a certain period of time) and how these tie into muscle excitation states.
Also of interest is the bottom bracket height on the beater bike — at about 10.8″, it’s on the high side when compared to sports bicycles, which are typically around 10.2″ or 10.3″. (The bb height is the distance from the ground to the center of the bottom bracket — the “central movement”, where the crank arms are attached to the bicycle.) That additional 1/2″ or so that she will gain in a reduced step through height will be very beneficial on her custom bike.
Now that the lower body was squared away, it was time to address the upper body. As it came equipped from the pawn shop, the Fisher felt very cramped, causing the rider to push back on the saddle in search of a more natural position. Without knowing this rider’s “geometry”, I would guess that this is a result of trying to get the knee in the correct position over the pedal. A lot of women find themselves doing this! Her solution was to put a very set-back seat post on the bike. Other adjustments involved raising the handlebars to get them in the right position relative to the saddle. Here’s the “new” bike:
You may be looking at this and thinking it still looks like a pawn shop bike. Yes, but, to turn the phrase, beauty is only skin deep. What this is becoming is a blueprint to a bike that fits and does what its owner wants it to do. Once the crucial measurements are dialed in, like the reach, the crank arm length, the effective seat angle, etc., the blueprint is complete.
Wow! Have we learned a lot, or what?! As this rider renews her cycling skills, she will undoubtedly tweak the bike even more. The search for the proper riding position is always ongoing. I think the term “evergreen” applies perfectly to this situation.
Many thanks to her for sharing the journey so I could share it with you!
Tailwinds,
• Crank Shorteners
• Adjustable length cranks
• Customizing crank length
• Studies on crank arm length:
• Adults
• Children
• Buttars, Kent R. “Crank Length and Gearing.” Bicycling July 1982: 26-37.
• Make your own bike “blueprint”


Leave a Reply